
Building A PPC Campaign
4.1 Determining your PPC goals
Welcome to the most important chapter in our guide: how to structure a PPC campaign.
We’ll start out by visiting with our imaginary client, Anya’s Organic Juices, and helping them nail down their primary goal. Is it just more website traffic? Or is it sales? Do they have an app they want to download? Or is it just brand awareness and increasing visibility?
The campaign will look very different depending upon the goal. It’ll target different keywords, use different PPC channels, and there will be totally different types of metrics to watch.
Anya’s Organics wants to increase visibility & branding as they expand their operations across the West Coast, but most of all they want to increase sales from their new ecommerce store. Website traffic is a secondary concern: it’s nice to see more visitors, but we want quality over quantity.
Because of this, we will use multiple strategies to target both goals: branding and sales. For branding, we’ll use display campaigns & video campaigns. For sales, we’ll use a search campaign, a shopping campaign, and some remarketing.
Before you start a campaign, make sure you have these questions answered:
- What is my goal (why do I need PPC?)
- What is my monthly budget (how much am I willing to spend to accomplish my goal?)
- If my goal is sales, how much can I spend and still be profitable (cost per acquisition?)
- Where does my target audience live?
- What age & gender are my ideal audience?
- What topics are my ideal audience interested in?
- What is their economic demographic?
- Does my product require a lot of research before purchase, or is it an impulse buy?
Only after you have answers to all of these questions can you start setting up your PPC campaign. If you do it before you know these answers, you’ll incur a lot of expense and no revenue.
4.2 Choosing The Right PPC Channel
Different channels work for different niches. We’ve seen clients that spent $60,000 a month on Facebook ads and got an ROI of 25%, but Google Ads just wouldn’t work for them. We’ve seen other clients spend $30,000 a month on Google Ads with an ROI of 50%, but months of Facebook ads would just not bring any sales.
The main difference between these two clients was that the first had a low cost product that many people would see on Facebook and purchase on impulse without researching. The second client had a high cost product which people researched on Google for months before purchasing.
But in the end, even if only one channel works for you, it doesn’t mean you need to ignore the other. If Anya’s Organics is doing amazingly on Google, but doesn’t have a presence on Facebook, the company might not have a lot of trust. And trust is 99.99% of sales (that’s a made up number, but we’ll stake our reputation on it).
Test extensively. Patience is a virtue, since you shouldn’t expect too many sales at the beginning as you spend to build your brand. Good upfront branding will pay back double in the end!
Start with Instagram if you’re selling fashion. Facebook if you’re selling funny t-shirts. Google Ads if you’re selling trips to luxury resorts in Africa. And don’t forget about Bing Ads if you’re targeting the US.
4.3 Campaigns For Brand Awareness & Visibility
Historically, branding has always been one of the most complicated types of campaigns to track. It takes a longer time to show results and it’s difficult to associate specific results with the campaign. A branding campaign will create awareness, and people will know your name, but it doesn’t necessarily bring you immediate sales.
Display campaigns
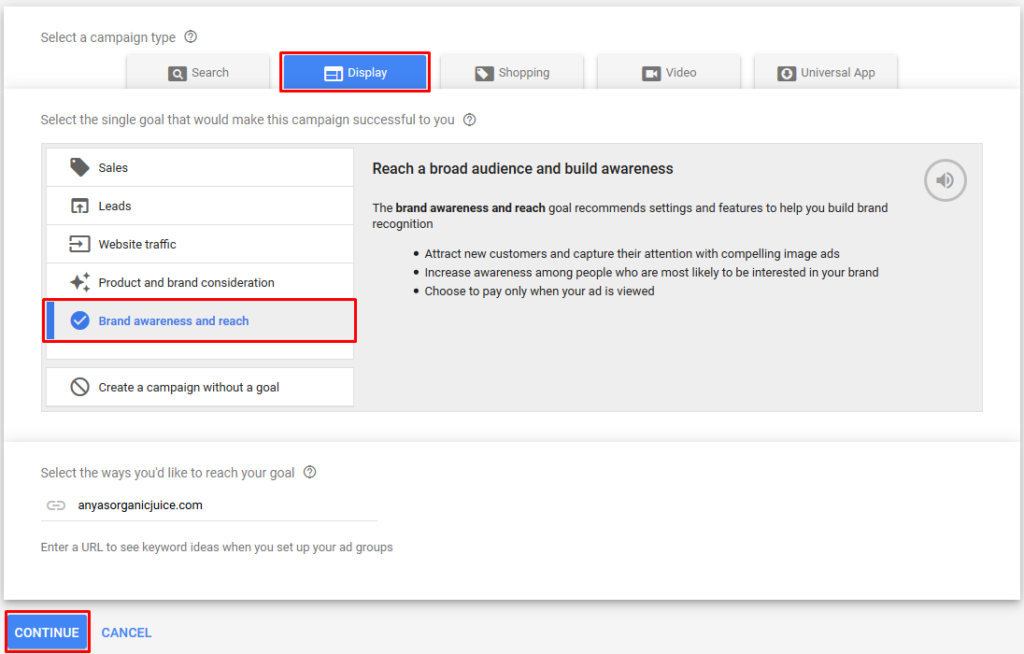
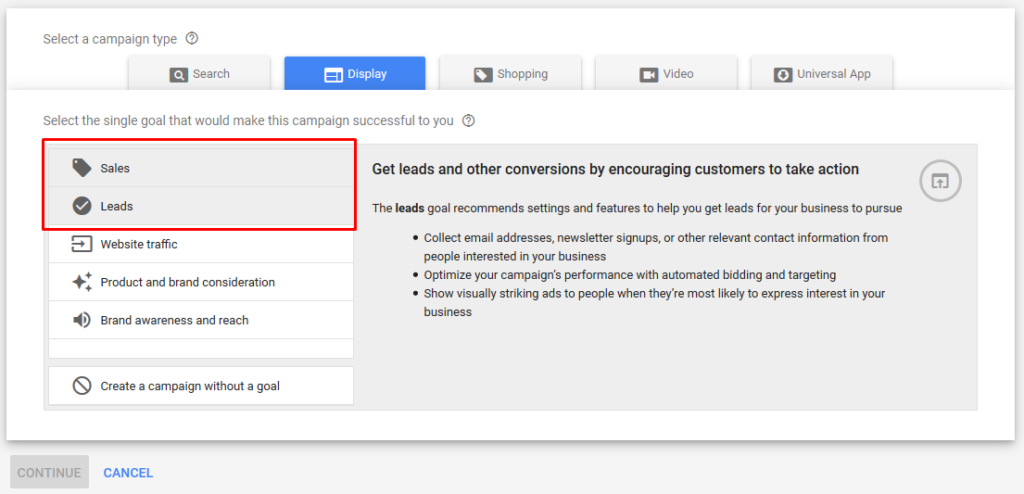
When you create a new campaign, Google Ads allows you to choose the goal for your campaign (we will choose brand awareness and reach) and it guides you in what settings you’ll need to pick in order to be successful in this goal. To do this, go to your Google Ads Account > New Campaign > Display.
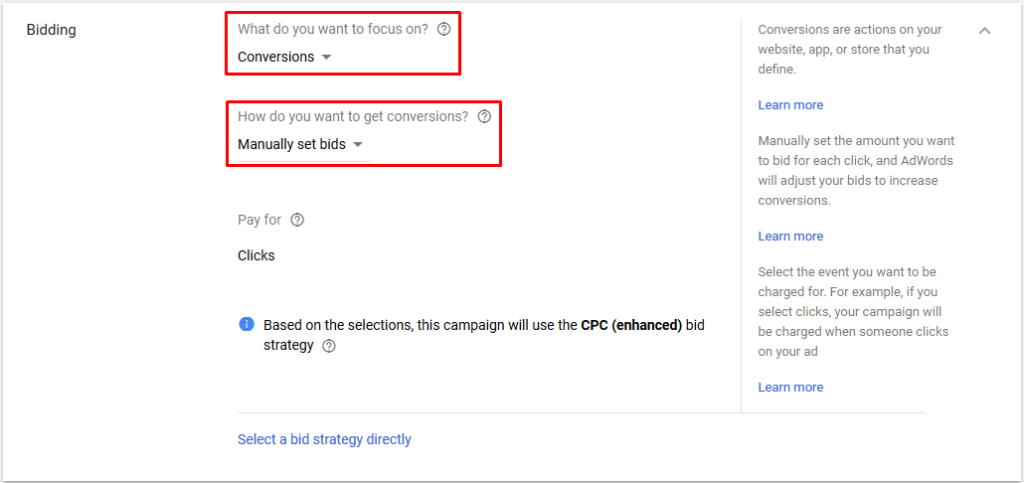
After you click continue, you’ll be given options to set which country you’re targeting, and what budget and bidding strategy you’re using. When choosing bidding strategy, I recommend focusing on Conversions and setting your bids manually.
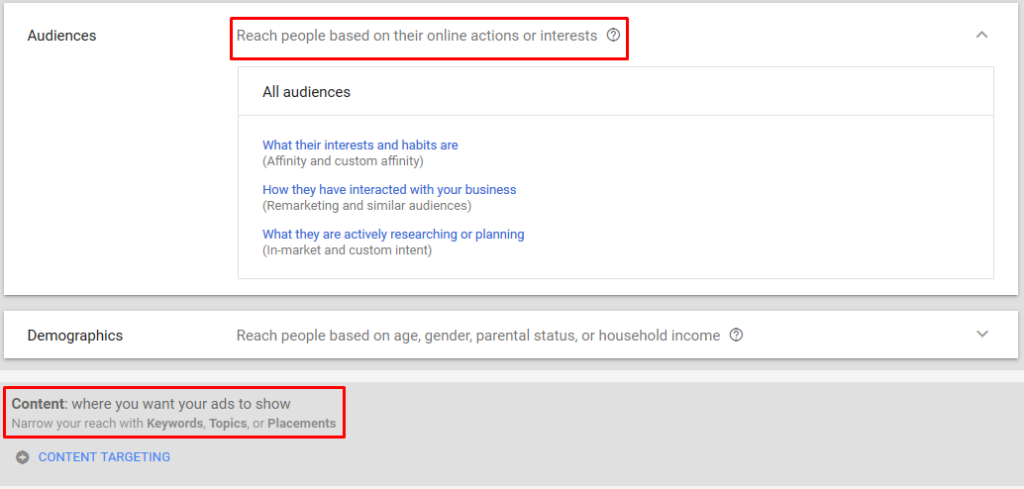
Now, it’s time to choose your audience! You have two options: either targeting users based upon their online actions, or targeting specific websites based upon topics and keywords.
For a branding campaign, I recommend testing both options and determining which brings you better results. To choose your audience, I suggest starting with a Custom Intent campaign. A Custom Intent audience allows you to make a list of keywords your perfect customer uses. Based upon this list, you’ll have an audience that is actively researching using the keywords you picked.
If you’ve got a list of websites that use Google AdSense and have a high volume of traffic, you can create an audience which only includes users visiting these websites. To do this, create your audience using Content Targeting > Placements.
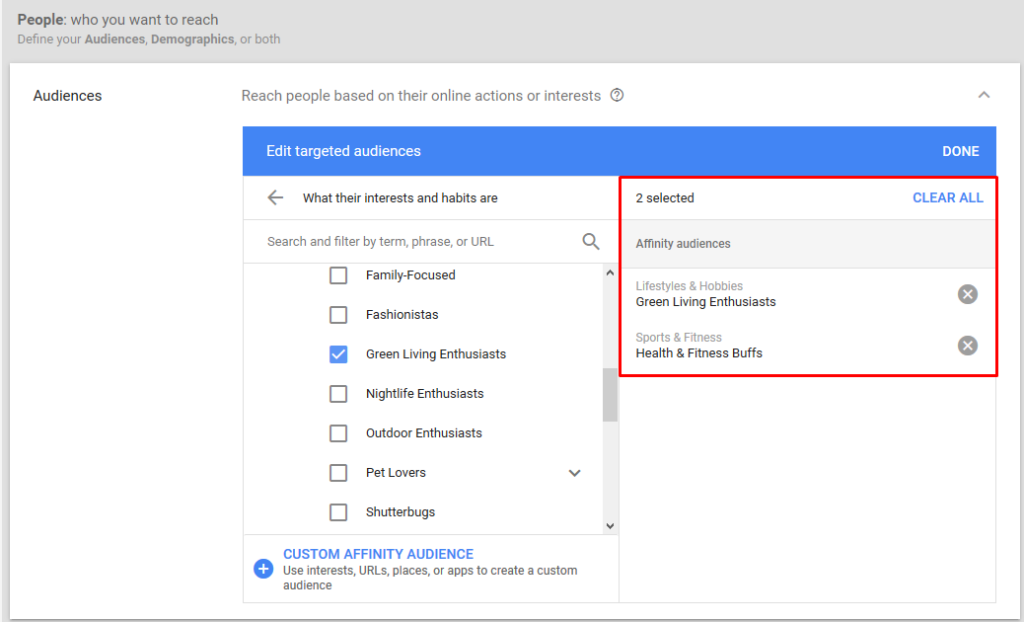
If you’d rather target users based on their interests and habits, you can create an Affinity Audience. This gives us options for Anya’s Organics like “Green Living Enthusiasts” and “Heath & Fitness Buffs”.
Once your audience has been chosen, you can start creating your ads.

You’ll be given a choice between creating Responsive ads, uploading display ads, and copying existing ads (if you have them). The difference between creating responsive ads and uploading your own is that for responsive ads, you just need to upload one image in 2 sizes. You’ll also be able to add a title and description. Google Ads automatically adjusts the ad size, appearance, and format to fit available placements.
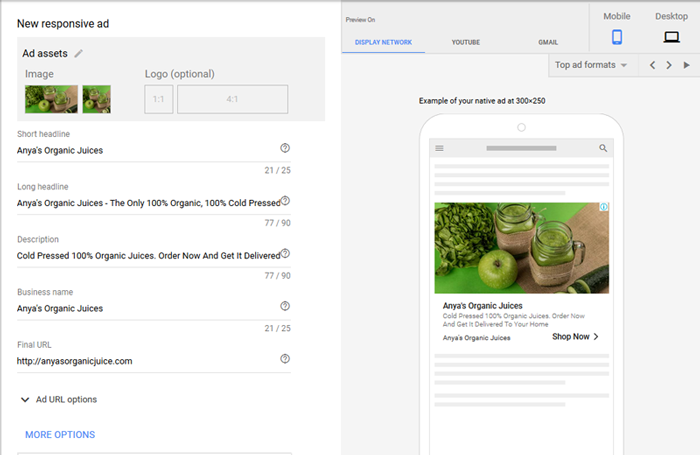
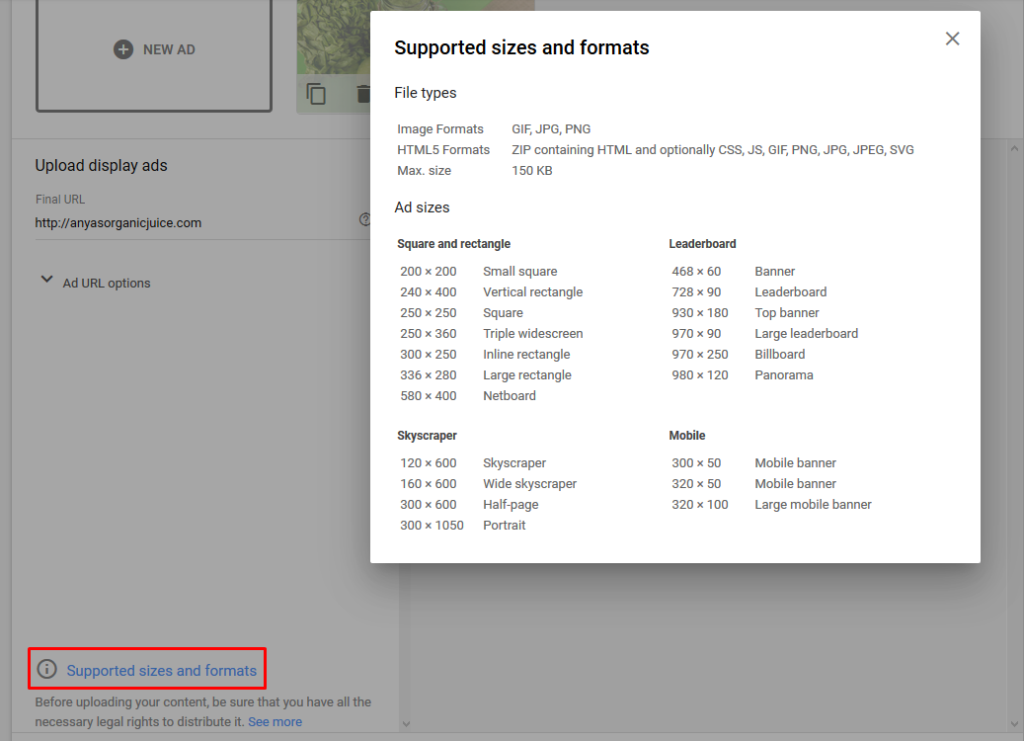
If you choose to upload your own ads, you’ll need to create images with text overlaid, for each display format you want to appear for. Click “see supported sizes and formats” for specs.
Your ads need to be memorable but not too pushy. You’re not trying to annoy your users! Have a clear message, use short sentences, and explain the top benefits of your service.
Video Ads
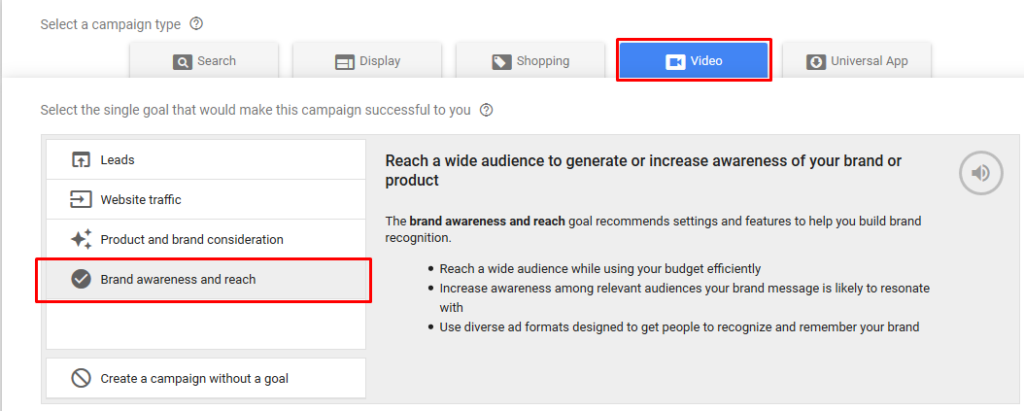
Video advertising (usually on YouTube) is an excellent strategy for affordably raising awareness about your products. Setting up a YouTube campaign is easy. Go to your Google Ads account > New Campaign > Video and choose your campaign goal to be “Brand Awareness And Reach”.
You can pick audiences the same way as the display campaign mentioned previously. You can additionally select specific YouTube channels you want to appear on, or choose which topics and keywords you’d like to appear for. Continue by choosing location, budgets, and bidding. For a video you bid per view (CPV) and on average, bids cost a few cents.
For a branding ad, you’ll only be able to select in-stream video format ads. In-stream ads are the videos that play before, during, and after another video. Users have the option to skip an ad after 5 seconds.

Make sure your video has a single main call-to-action. Don’t forget that you’re targeting users who have no idea who you are. Get their attention in the first 5 seconds (before they can skip). Don’t use too much noise or annoyance: that’s not how you want to get their attention.
Search Campaigns
All search engines support search campaigns: ads which appear in the SERPs (search engine results page). For branding campaigns, you don’t want to target highly specific keywords or phrases. Target users searching for information and ideas: people who are still in the research phase rather than ready to purchase.
For Anya’s Organic Juices branding campaign, we’ll target users searching for “detox juice diet” and “benefits of cold pressed juices” rather than users searching for “where to buy organic juices near me”.
Doing this will allow you to target a much broader audience. The CPC for general terms is usually cheaper, as well. You’ll be the first brand they see during their research. Even if your audience is not ready to buy right away, when they’re ready they’ll have you in mind and likely go directly to your website.
To get started, go to your Google Ads account > New Campaign > Search.
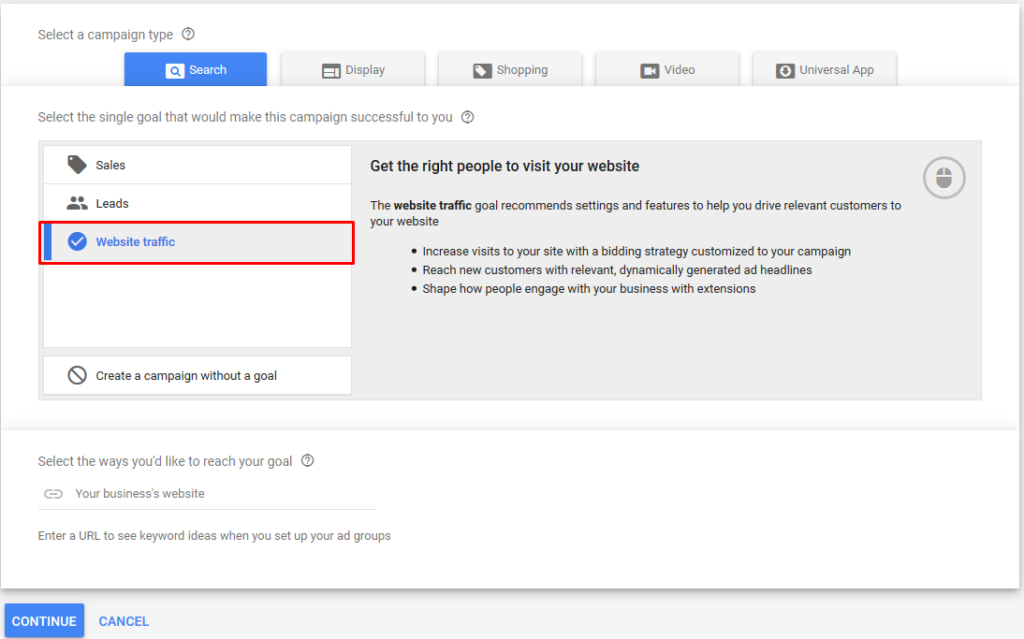
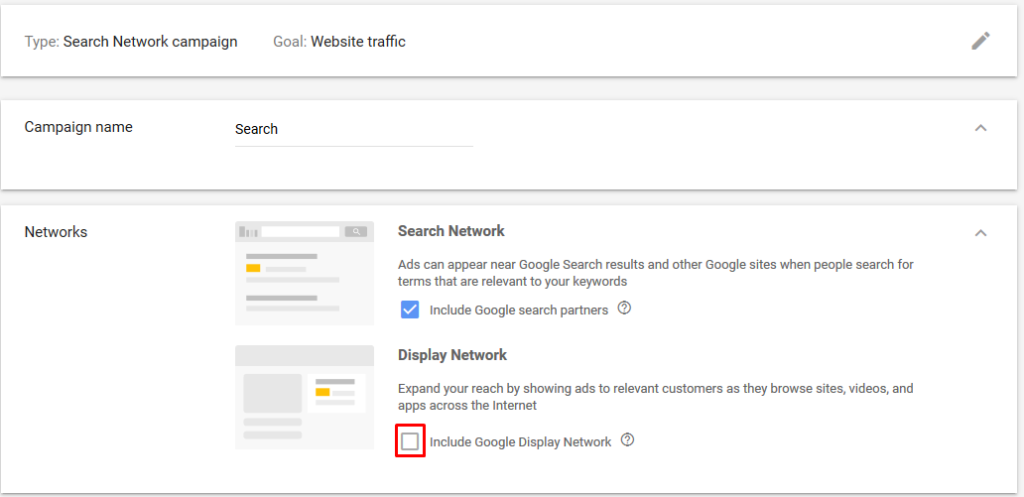
Your goal for a branding campaign is to get as much website traffic and visibility as possible.
When you create the campaign, make sure it’s Search campaign only. You don’t want to have your Search and Display campaigns in the same place, so uncheck the box saying Display Network. It’s recommended to keep them separate to analyze results and optimize campaigns based upon performance.
Now choose your targeted location, budget and bids. You don’t have to create your extensions now. Create them later in the process: it will allow you to have more time to think about it.
If you want to target users located in a specific location, make sure this is selected.
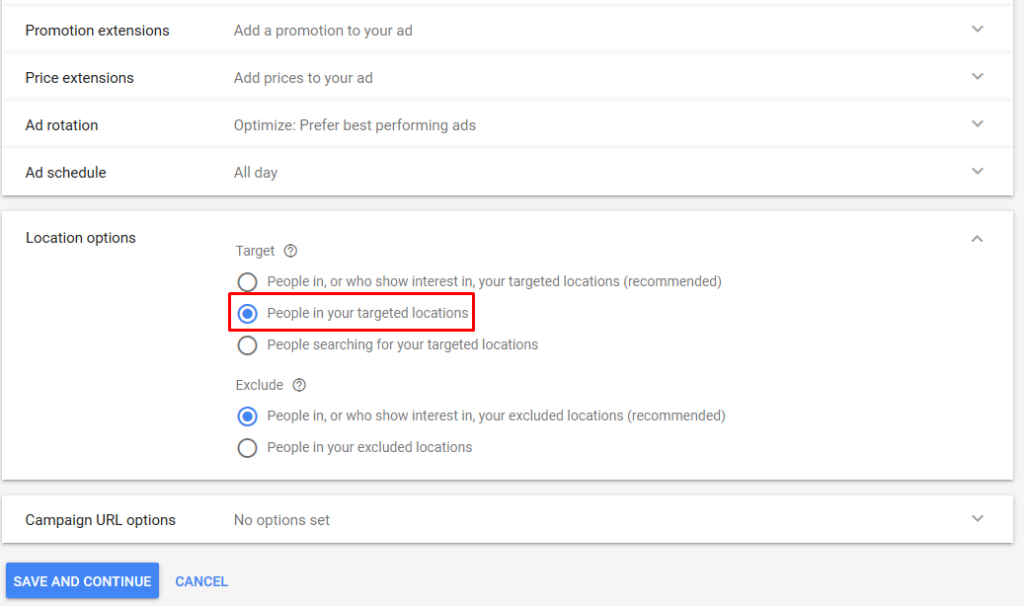
I don’t recommend choosing “people who show interest in your targeted location” as this usually results in poor quality traffic: Anya’s Organics doesn’t want to advertise juices for someone in Mongolia who has shown interest in California, for example.
Now, all campaign settings have been created. For a search campaign, you’ll have more ad groups. You can create them right away, or do it later. Remember the table we created in the keyword research chapter? Use the column title as your ad group title, and the phrases in the column as keywords.

Adding a plus in front of every word is the “broad match modifier” match type. This tells Google that you want to appear for searches that contain each keyword in any order.
For +buy +organic +juices, we’ll appear for searches like “where I can buy organic juices” or “buy local organic juices”.
And finally, in a later chapter we’ll talk more about how you can analyze your branding campaign’s performance. But in short, one of the main ways to keep an eye out for success is through and increase in brand searches, organic traffic, and direct traffic to your website.
4.4 Campaigns For Increasing Sales
If you’re already in the market and your website/brand is trustworthy, you probably want to focus on making sales. You should use a sales-focused strategy, rather than just branding.
Search campaign
When creating a sales-focused search campaign, you want to focus on searches that show an interest in purchasing your product. Your campaign should be specific and well-structured.
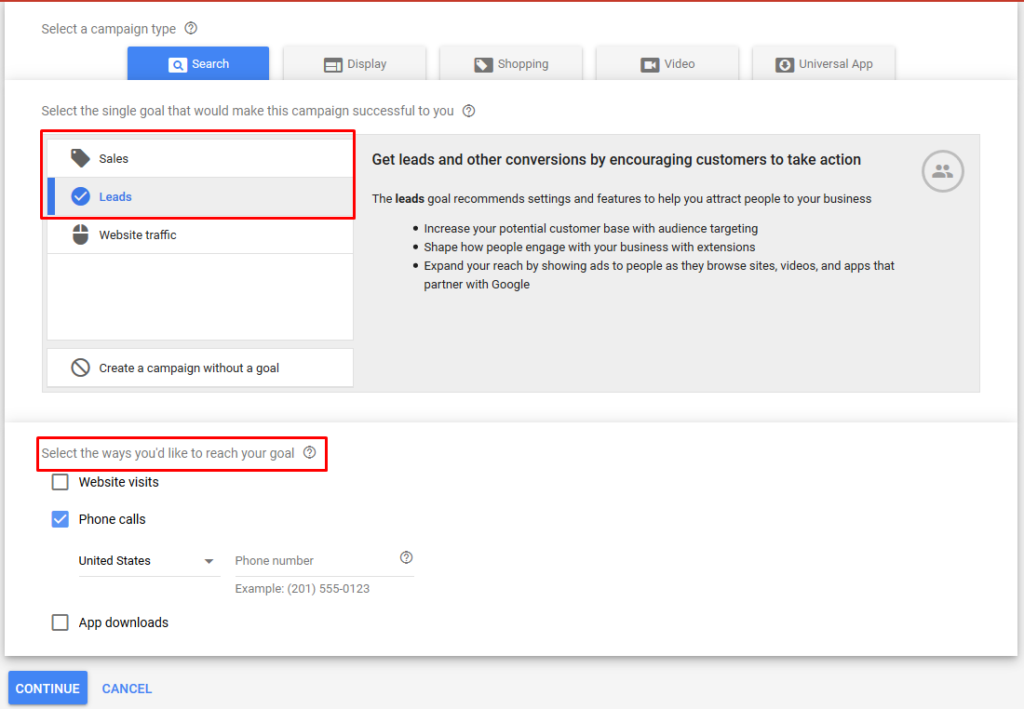
The setup itself is similar to search campaigns for branding purpose, but you want to focus on conversion and leads rather than website traffic. From the beginning you pick a different goal: sales if you have an ecommerce website, or leads if you have a service-based site.
Remember the branding campaign for Anya’s Organics? We wanted to target users searching for educational info about cold pressed juice. Now, for their sales campaign, we want users searching for “buy organic juices online” or “the best place to buy organic cold pressed juices”.
Make sure you have Analytics tracking all your leads/sales, and track all the phone calls both from ads and from the website.
Shopping campaigns
Shopping campaigns show great results for ecommerce & retail websites. The primary benefit is that users see the product images, price and description before clicking. This means you only pay for clicks from users who know what to expect.
The limitation is that Shopping campaigns are not available in all countries. You can find the current updates to the list here.
To create a Shopping campaign, create a product feed with all included info required to be eligible. The fields you need to have depend on what type of product you’re advertising. You can find the list of all Product Feed Specifications and the format of your data right here. Add this into a spreadsheet.
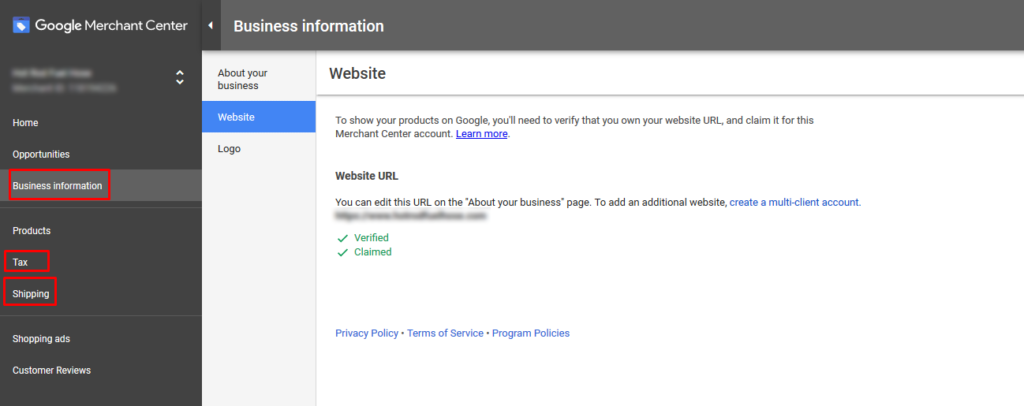
Your next step is creating a Google Merchant Center account. Add all your basic business information, verify your URL and add all Tax & Shipping information.
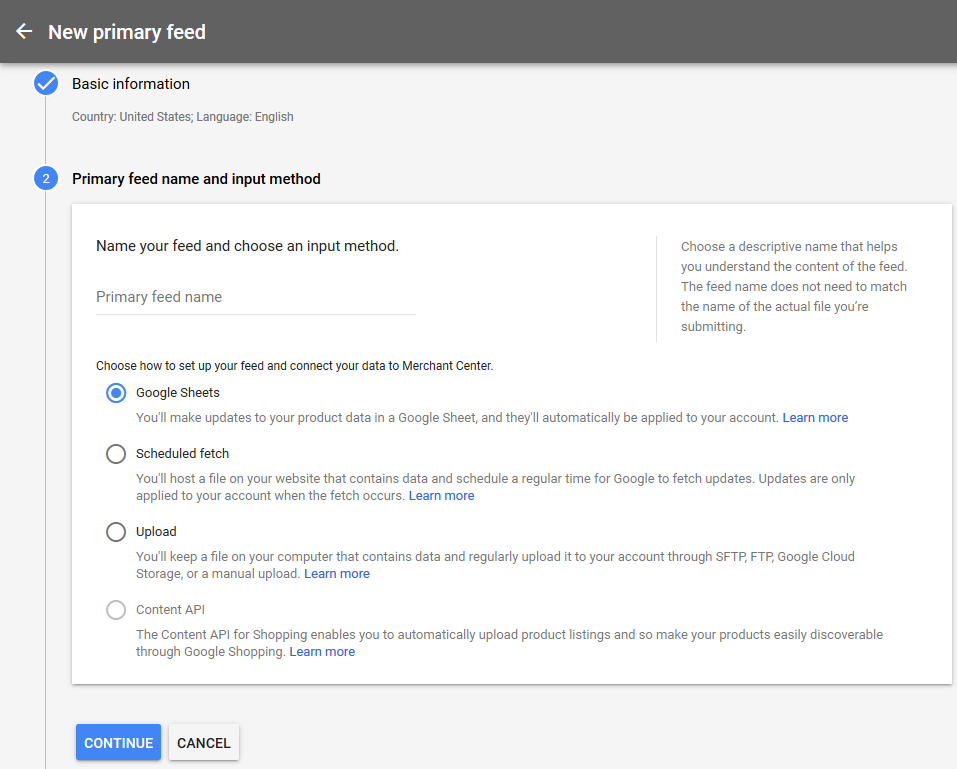
After this, upload your spreadsheet in the Products tab > Feeds > (+)New Feed. You can only choose one country and one language per feed.
After this, you’ll be able to see how many of your products have errors and what should be changed to fix it. You can re-upload the document once it’s fixed.
This is how your nightmare might look like:
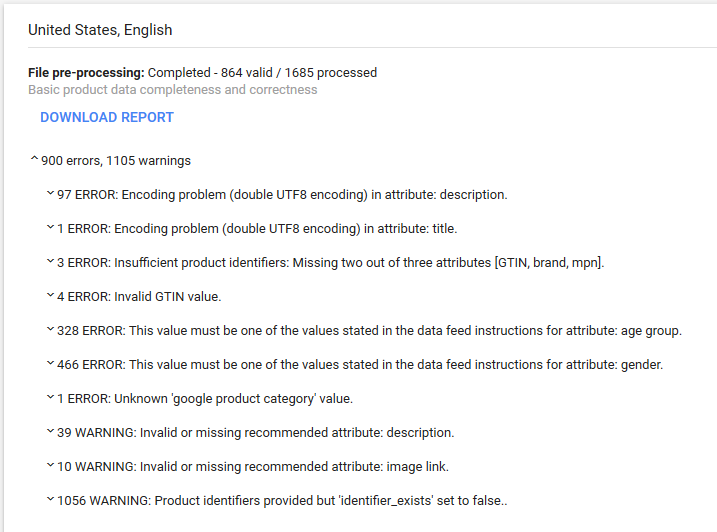
There’s no easy way around this: it’s not an easy process. Some ecommerce software services like Shopify help automate the process, allowing you to connect the website’s product database with your Merchant account. The benefit of this is that your data is always updated.
Remarketing campaigns
Remarketing campaigns allow you to show your ads to defined audiences of users who’ve already visited your site. You can seperate users based on their behavior (converters vs non-converters), for users that visited a specific page on your site, are from a specific region, how many pages they visited, or time spent reading your articles.
You’ll need to create your audience in Analytics. Your audience needs at least 100 unique users before it starts running, or 1000 users for a video or search remarketing campaign.
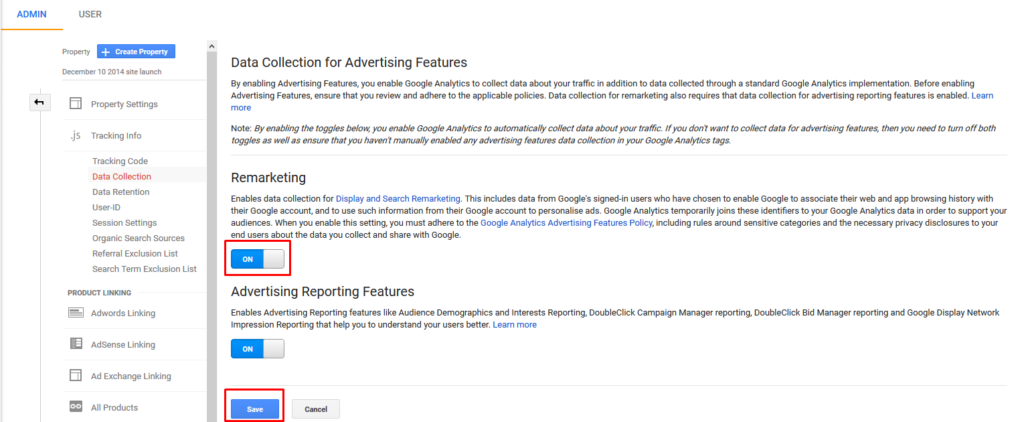
First, allow Analytics to collect remarketing information in Settings > Tracking info > Data Collections. Make sure Remarketing is on.
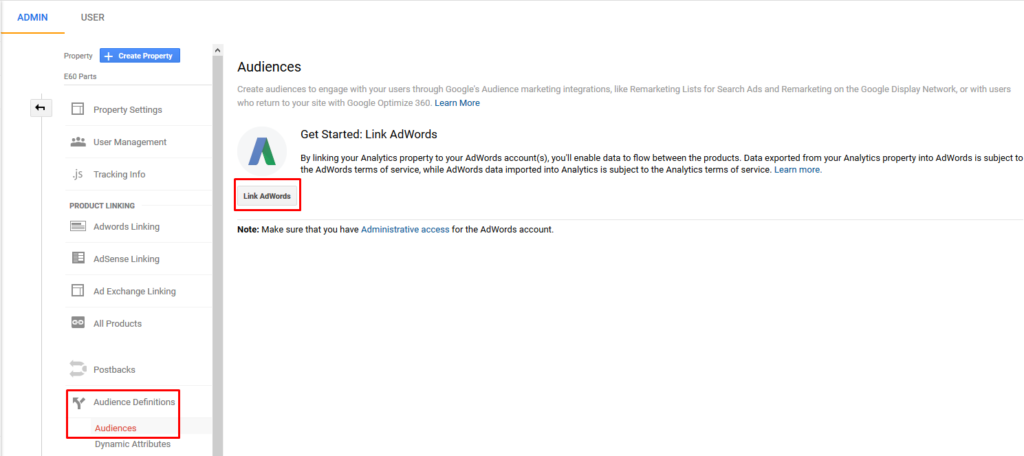
To create your audience, go to Settings > Audience Definition > Audiences
Make sure your Google Ads account is linked to Analytics:
Once you do that, you’ll have your first audience created: All Users.
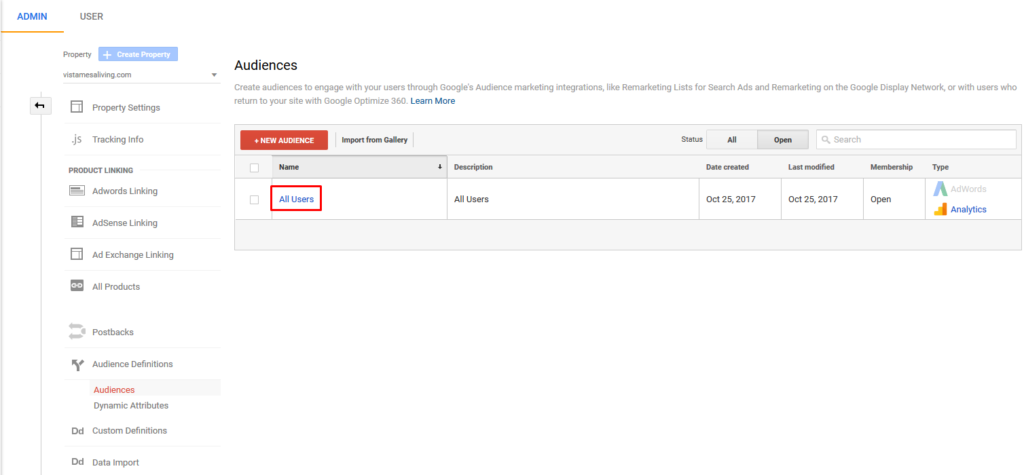
As your Google Ads is already linked to your Analytics account, your Audience will be imported so you’ll be able to find it easily within your account.
The All Users audience is useful if you have a new campaign, with no sales and an amount of users less than 100. Otherwise, you want to create an audience that excludes those who already purchased from you.
It’s very annoying when you already purchased from a brand, but the ads continue following you. To avoid users being annoyed, and spending your budget needlessly, create a new audience that excludes converters:
Go to +New Audience
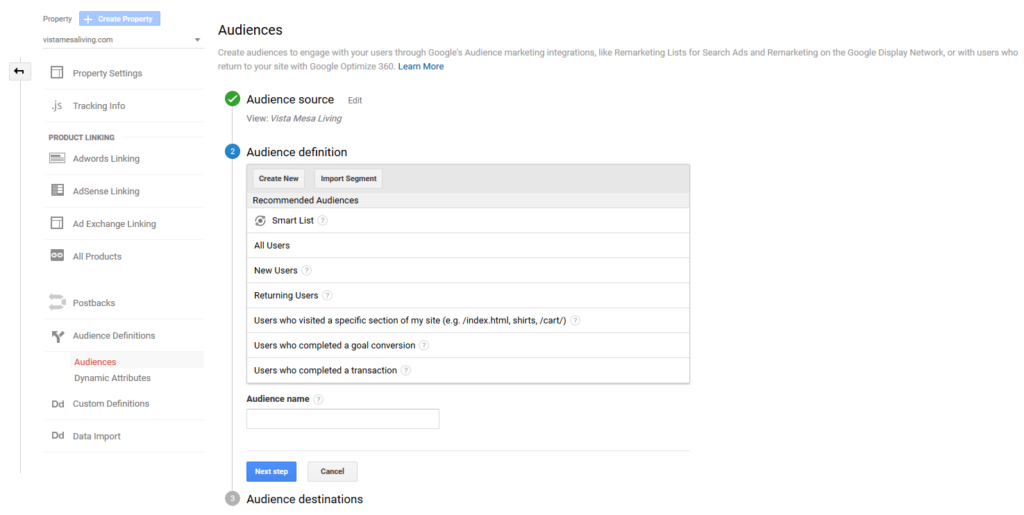
Either create a custom audience or pick from existing options. Creating a new audience will give you more choices.
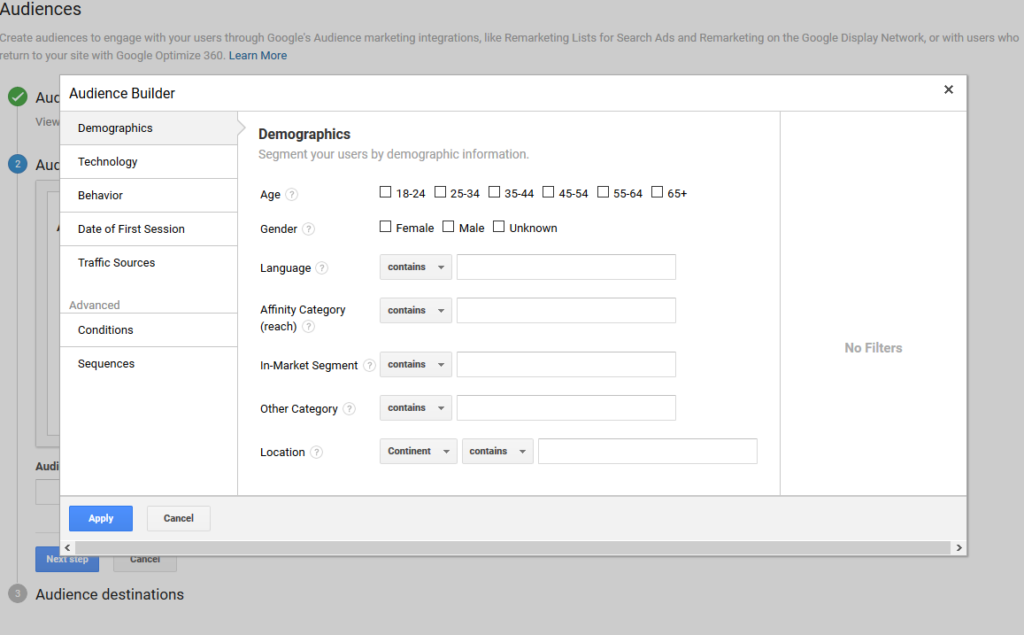
You can see all your filters now. To create an audience that excludes all conversions, go to Conditions and exclude users with more than one transaction or more than one goal completion:
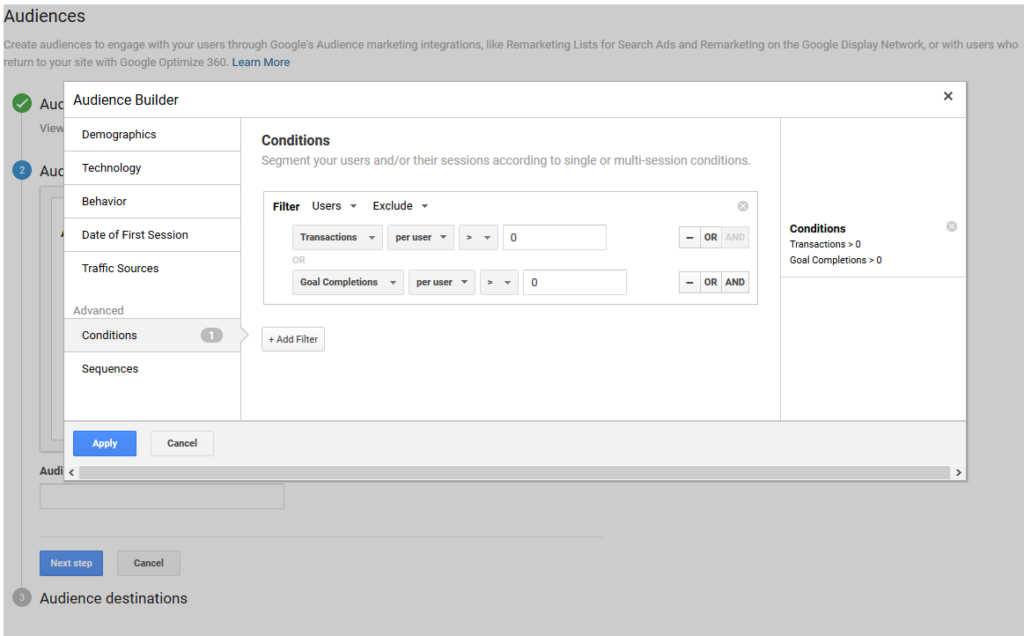
Now, name your audience and it’s ready to be used!
There are 4 campaign types you can use your remarketing list in:
- Display Remarketing
- Dynamic Remarketing
- Video Remarketing
- Remarketing Lists for Search Ads (RLSA)
Each of these campaign types allows you to connect with your previous customers. The benefit is that you can personalize your message based on user behavior.
To create Display Remarketing, you (obviously) need to create a display campaign. The process is the same as creating a branding display campaign. The difference is in the audience. This time you choose your goal to be either Sales or Leads:
Choose your audience as remarketing:
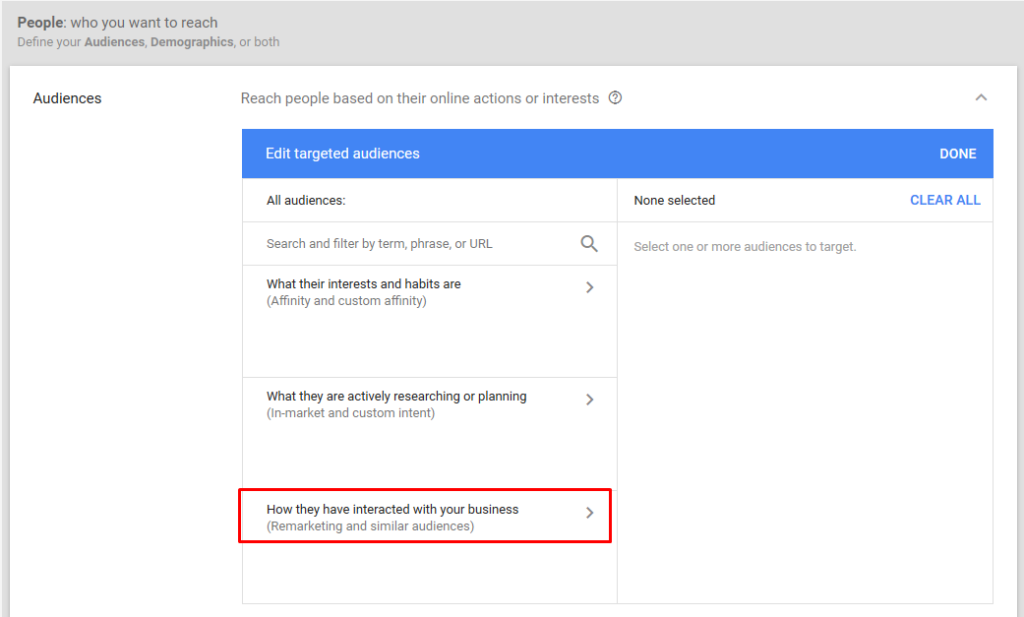
You’ll see a list of all remarketing audiences that you’ve created in your Analytics account. Choose the one you need. If you have multiple audiences with different audiences, create an ad group for each of them. This will allow you to personalize your ads and messages. When creating ads, remember that the users you’re targeting are already familiar with your service. Don’t be salesy: try to be creative and personal.
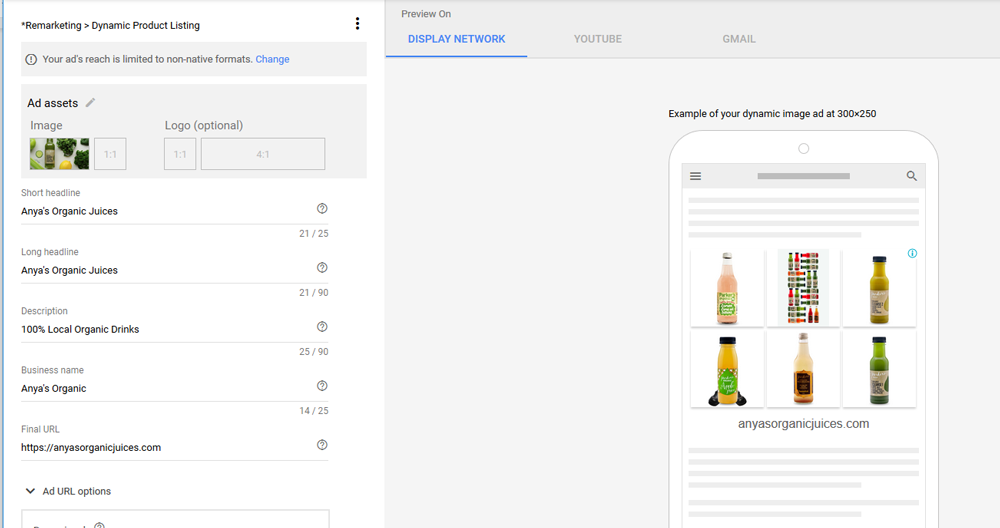
A Dynamic Remarketing campaign allows you to create display ads showing the exact product the user saw on your website. It will include a title and a description.
To create one of these, you’ll need a product or service feed. If you’re a retailer, you’ll need to use your product feed from Google Merchant Center (the same one you’re using for a Shopping campaign). Follow the steps of creating a simple display remarketing campaign. Below the Budget tab, you’ll see additional settings:
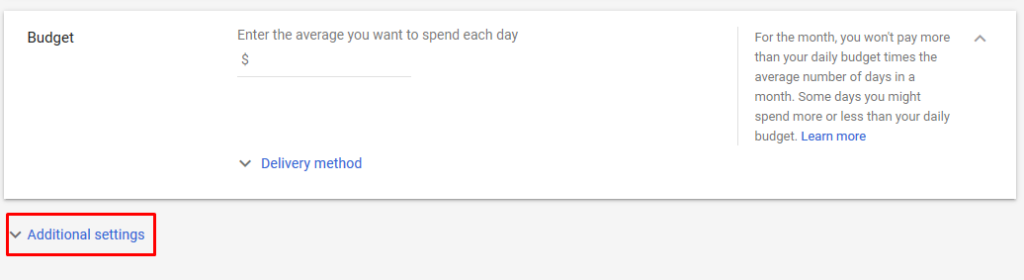
Open it, look for dynamic ads, and check the box that says “Use a data feed for personalized ads”. If you don’t have your feed already uploaded to Google Ads, just choose your business type:
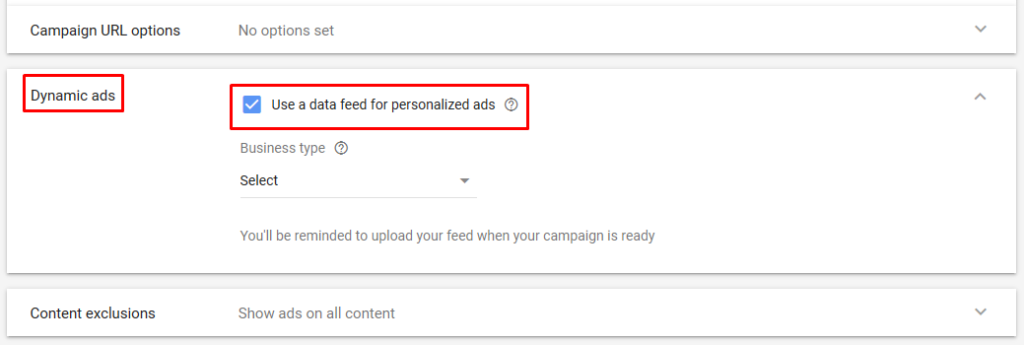
If you do have your feed ready to go, you’ll be asked to select it:

Then, in the Audiences tab, choose a remarketing list (I suggest creating a list with all users except those that already converted).
Now we need to create our ads. The process is the same as creating normal display ads, except now we’ll be able to preview the products from our feed. If you’re products are not shown yet, don’t worry. Sometimes it takes a while for Google to crawl all your images in Merchant Center.
Video Remarketing
To be able to create a video remarketing list, you’ll need to have at least 1000 users in it. Just create a normal video campaign, and choose the audience from one you created in Analytics (with over 1000 users).
Remarketing Lists for Search Ads (RLSA)
This one is an addition to a simple search campaign. It lets you personalize the ads and bids for those who’ve already visited your website while searching on Google.
Let’s say someone visited Anya’s Organics but didn’t purchase anything. Here, we’ll choose that as your visitor continues their research you’ll bid 2x your normal bid to make sure you’re always on top of all their search results.
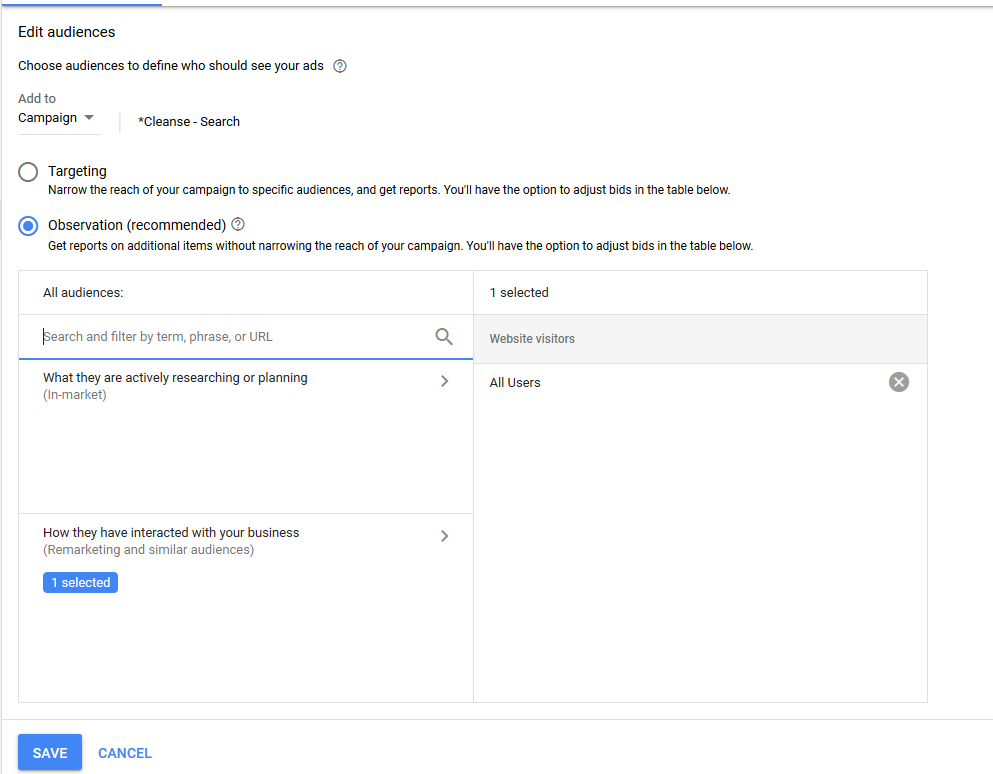
To add this list to your search campaign, go to the search campaign to change > Audiences > the pen!
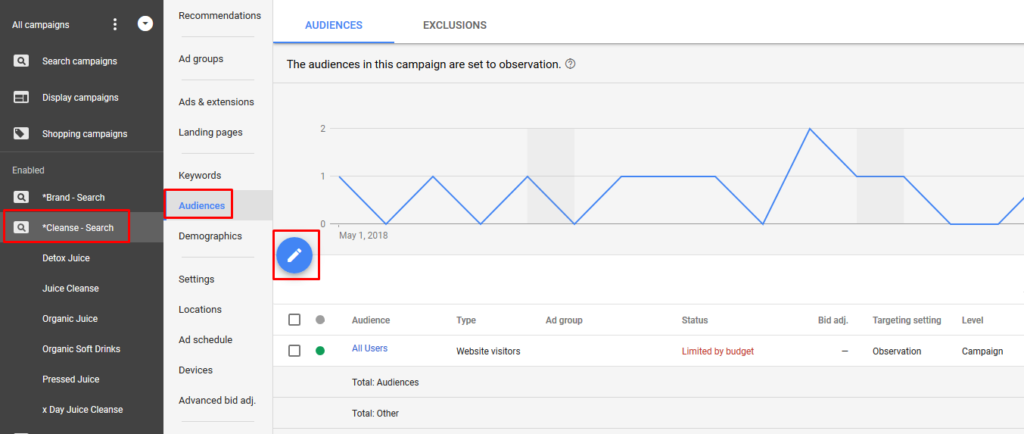
Either add the audience to target only those users, or choose the audience for observation.
If you choose “Targeting” it allows you to show ads to your remarketing audience ONLY. So you can personalize all the messaging with the idea that they’ve already visited your site, and maybe try sending them to a different landing page.
If you choose Observation, you’ll still be able to adjust your ads and bids based on the audience, but the campaign will include all users searching for your search terms. And, same as for video ads, you need at least 1000 unique users in your audience before you can start the campaign.
4.5 Campaign structure and naming
Now that we know which campaigns we need, and how to set them up, we need to think more about our account structure. It’s important to do it correctly, since the more organized the campaign the better we’ll be able to optimize later on.
While doing keyword research, we’ve already completed half of the job!
First, we decide what type of campaign we want to start with. For Anya’s Organic Juices we want to have a Shopping campaign, Search campaign and a Dynamic remarketing campaign. We want to keep them all separated. Each will have a separate budget.
If you target different regions and maybe have different budgets for each, you might want to have 2 of each campaign: Shopping Campaign CAD and Shopping Campaign USA, for example.
Also, if we want to create a campaign with brand searches only (for searches like anya’s organic juices) you want to separate it from the main search campaign. The reason is that a brand campaign will always be 10x more successful compared to non-brand campaigns. For the simple fact that if someone searches directly for your brand name they’re already much more likely to convert compared to a general researcher.
If you’ve got a product that you want to gain more attention, with a separate budget, you also want a separate campaign. Let’s use Kombucha as an example.
Ok, so, now we have 5 final campaigns:
- Shopping Campaign
- Dynamic Remarketing Campaign
- Brand – Search
- Kombucha – Search
- Organic Juice – Search
As shown in the example above, their names should be short and clear. It’s like creating product category on your website. Never use names that are too generic like “Campaign 1” or it will be a nightmare to remember which campaign does what. Now that we have them, we need to name our ad groups. When we did our exercise in the Keywords Research campaign we already did that. So our final version will be close to this:
- Shopping Campaign
- Shopping Ads
- Dynamic Remarketing Campaign
- Dynamic Remarketing Ads
- Brand – Search
- Anya’s Organic
- Kombucha – Search
- Kombucha
- Organic Juice – Search
- Juice Cleanse
- Detox Juice
- x Day Juice Cleanse
- Organic Juices
- Organic Soft Drinks
- Pressed Juice
The ad group name should represent the keywords targeted within it. In the “Pressed Juice” ad groups you want only keywords containing the words pressed and juice, like +buy +organic +pressed +juice or +pressed +juice +delivery.
Beside helping you track everything better, it will also help improve your Quality Score and relevancy. In the end, the better your campaign is organized, the less you’ll pay for your clicks and the higher your revenue will be.
4.6 Ads & Extensions Creation
The ad itself is very important as this is the first thing the user sees before interacting with you. Whether we’re talking about social media ads, search, or display, all ads should follow the same rules. One of them is: be respectful to the users. Have nice visuals, clear message, good grammar, quality images and a clear call-to-action.
You’d think it goes without saying, but just remember the ads from 7 years ago. Some advertisers are still trying to use those old techniques, but thankfully they’re now forbidden on most advertising platforms.
You can find all Google Ads editorial rules here. But in short, your ads can be disapproved for:
- Poor splling or gramar
- !!!Too many exclamation points!!!
- WORDS WRITTEN IN CAPS
- CLICK HERE
- No emojis 🙁
- youcannotdothiseither
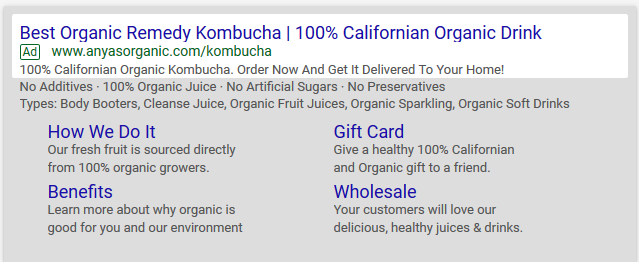
To write great ads:Include your main features and benefits. What makes you better than your competitor? Do you have anything unique that you provide? What problems does your service help with? What does your customer gain by choosing you?Add a call to action (CTA). What is the final action you want your users to take when they land on your website? We’ll choose something like “Get 100% Organic Juice” or maybe “Detox Your Body With Cold Pressed Juices”. The last one is both a benefit and a CTA. You want to be smart about your message as you’re limited by the number of characters you are allowed to use.Avoid repetition! Sometimes, when you don’t have any inspiration (or maybe your products don’t really have that many special benefit) it might be hard to come up with great copy. We often see ads that say the same thing in the title, description and extensions. And I’m telling you, it looks bad! You’re already limited by the number of characters, so don’t waste this space. If you have a special offer, use it in the ad! Either it’s “Free Shipping” or “10% Off The First Order”. Let people know even before they go to your website.A/B test! There is no single ad structure that works the best for everyone. You have to keep testing different ads and see how they perform. All ad groups should have at least 2-3 ads with slightly different messaging. Once you get around 100 clicks, see how different the performance for each of them is.Find which one has a better CTR (click-through-rate). Look at conversion rate. Which ad gave you move leads? There are ads that have a very high CTR but users aren’t necessarily the same quality as another with lower CTR.In the ads, use the wording your audience uses to search for your service. Looking at your search terms report, you might see that Anya’s Organics users like the phrase “Best Organic Remedy Kombucha” so why not use it as your title?
As an example, this can be our ad 1 (the actual ad text is in the highlighted area)
And ad 2 can be this:

Ad extensions
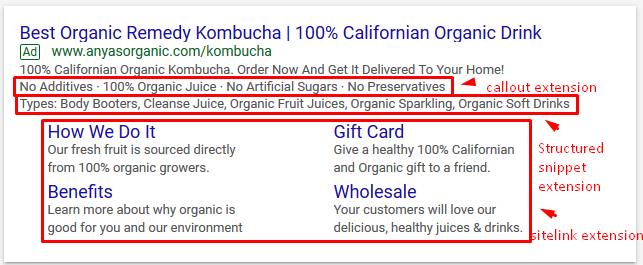
As you can see in the example above, the actual ad text is just a half of the job (or even less). To make your ad stand out and have more visibility you need to create ad extensions. There are a total of 10 types of extensions:
Sitelink extension – Show additional links from your website
Callout extension – Add some additional benefits of your products
Structured snippet extension – Add some specifics of your products (brand names, destinations)
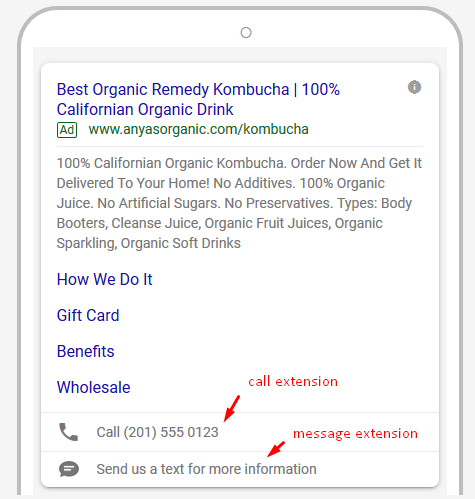
Call extension – Your phone number
Message extension – Let people text you directly from the ad
Location extension – Shows you business info (address, working hours)
Affiliate location extension – Show affiliate location
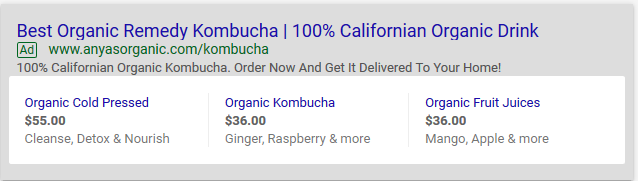
Price extension – Show prices of your products and services
App extension – Add a link to your app
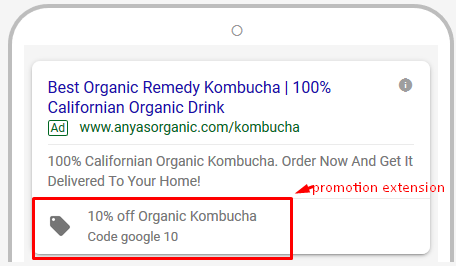
Promotion extension – Use it for special offers
4.7 Keywords Match Types
Keywords Match Types help control which searches your ads will appear for. It tells Google how flexible your want to be.
A keyword is the word you choose to target in your Google Ads account. A search term is the exact words or phrases the customer enters while searching on a search engine. These are different: don’t confuse them!
There are 5 main types of keywords.
Broad match
Ads will show for for synonyms, misspellings, and related searches. So, if your keyword is organic juices, your ads could show for buy cold pressed juices. Symbol: no symbols added
Broad match modifier
These ads will show only for searches that include your keywords (or close variations, no matter in what order. So, if your keyword is +organic +juice +delivery, your ads will appear for the search term home delivery organic juice. Symbol: Plus sign, for example +keyword
Phrase match
These ads will show only for searches that match a phrase (or close variations). It might have words before and after the phrase you target. So, if your keyword is “detox juice delivery” your ads will appear for searches like best detox juice delivery california. Symbol: “keyword”
Exact match
Ads will show on searches with the exact words or phrases you’re targeting (or close variations). So if your keyword is [buy organic juice], your ad will appear for someone searching for buy organic juices. Symbol: [keyword]
Negative match
Ads will show on searches that don’t include negative keywords. If you sell organic juice, but you don’t do wholesale orders, you’ll add the keyword -wholesale as a negative, and if someone searches for wholesale organic juices, your ads won’t show up. Symbol: -keyword
Because broad match keywords don’t give you much control over which searches you appear for, we usually don’t recommend using them. Use only when you have very low search volume or very limited niche.
Some other notes:
- There is no need to add keywords in both lower case and upper case. For Google Ads, +Organic +Juice keyword is the same as +organic +juice.
- Your keywords cannot contain symbols like: % ! @*.
- If you’re adding keywords for a display campaign, they’ll be seen as broad match only.
- Close variations include misspellings, singular forms, plural forms, acronyms, stemmings, abbreviations, and accents.
- You can learn more at Google’s site.
4.8 Budgets & Bidding
Bidding:
As we know, online advertising works on the principle that you pay when someone clicks on your ad (pay-per-click) and this is based on an auction. Let’s say that five companies want to appear for the search term “organic juices delivery”. Each will bid on this keyword. A bid is the maximum amount you are willing to pay for that click. Whoever pays more gets a higher position. The higher position you have on a search engine, the more people will see your ad.
The decision on how much you want to spend for a click is NOT totally up to you. The reason is that your competitors are already there, and have set an average of how much it costs to be on top of the search results.
Your cost per click should be competitive, in order for people to see your ads.
While doing keyword research you can usually get an idea of how much a click should cost for your keywords. For both Google Ads and Bing, you can do it from the Keywords Planner.

This number will not be our final bid, but gives an idea of where to start and what to expect.
As our CPC is different based on the bids of our competitors, in the exact moment someone searches our CPC will vary as well.
We can have different strategies for our bidding strategy. We can pick between:
- Manually bidding per ad group or even per keywords, based on their importance to us. It can take more time to analyse each keyword’s performance and choose the best bids for each, but the effort can save us a lot of money.
- Or we can go with automated bidding strategies developed by the search engine’s software. The benefits are that you won’t need to choose your bids. The downside is that you won’t be able to control your CPC and, based on our experience, a click that should cost $2 can turn into $15. You can still chose the maximum you want to pay, or you can choose how much you want to pay for conversion. But, we don’t suggest it. Use it only if you have a large amount of campaigns and you don’t have someone to look at the performance regularly.

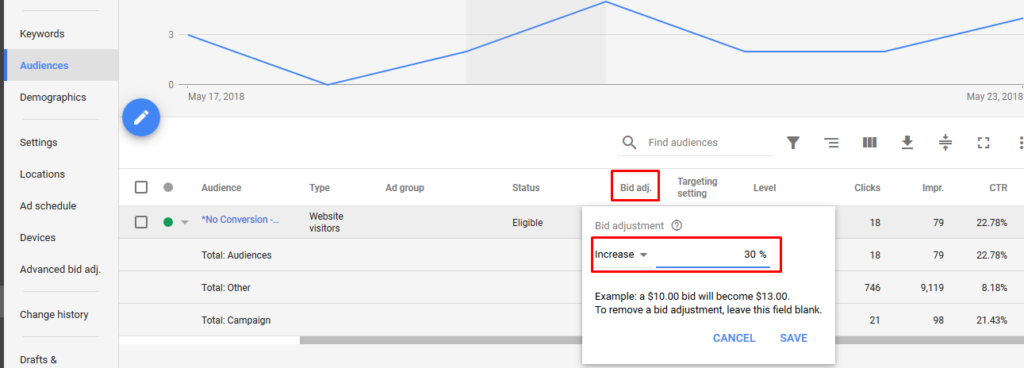
If you decide to use manual bidding stategy, you can add an option to add a bid adjustment based on device, location, audience, demographics and even household income (for US only).
If you’ve decided that you want to bid higher for users that have already visited your website, you can import your audience from Analytics (as we previously discussed in the remarketing section) and add a bid adjustment of +30% to make sure that you appear on top for all users that are already familiar with your business.
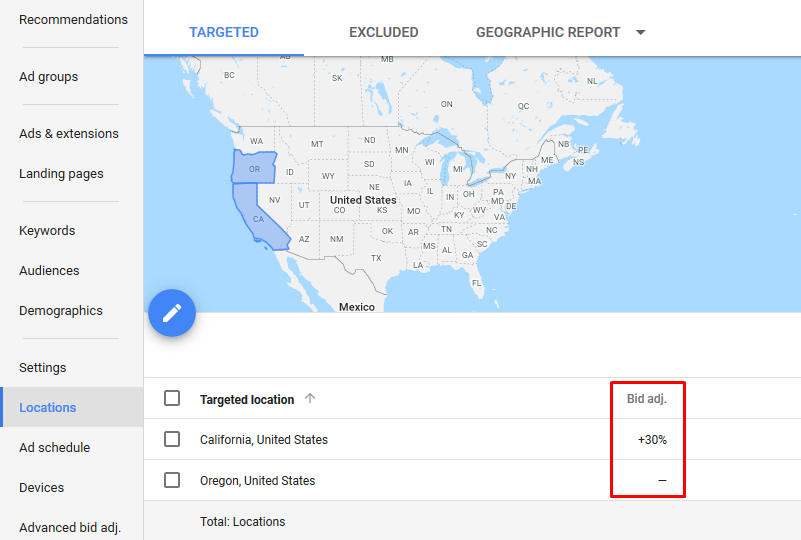
Also, if you are targeting a bigger country like the US, some areas might be more competitive than others. With the same bid, you might be the first position in Arkansas, but only the fourth for California. In this case you add bid adjustment to make sure you have a good position even in more competitive areas.
Don’t forget that when you set up a new campaign, you assume which bidding strategy and which CPC is the best for you, but you never know for sure. Once the campaign has some clicks, make sure you update and optimize based on performance, conversion rate and average position.
Also, don’t forget that you can lower your CPC by having a high Quality Score. The better the user experience is and the more closely targeted your campaign is, the lower your CPC will be.
Monthly Budgets:
Now that we know the approximate cost per click, we’ll need to decide our monthly budget.
Let’s say that Anya’s Organics estimated CPC is $2.50. We must calculate the amount we can spend in order for a sale to be profitable.
If your average revenue per conversion is $100, but your built-in overhead (besides advertising expenses) is $40. Your margin = revenue-expenses, or $60.
Now that we know the margin, we know how much we can spend on advertising per order. If our average CPC is $2.50, we need to make a sale every 24 clicks to break even (24*2.50=60). However, Anya’s Organics wants to turn a profit (don’t we all?) so they decide they need to make a sale every 20 clicks (for a $10 profit per sale).
So we want to spend a maximum of $50 on advertising per sale. This might not happen right away as it’s a competitive niche. So we’ll need to test the campaign, see what works best, and then work on getting the desired cost per conversion.
It’s also essential to understand our desired conversion rate. To calculate it, divide conversions by the number of interactions with your ad. To get a sale every 20 clicks we need a conversion rate of 5%.
In the end, you will also want to know your ROI. Calculate this with the formula below:
ROI = (Revenue - Total Cost) / Total Cost
In our case that would be ($100 -($40+50)/ (40+50) *100% = 10/90*100% = 11.1%
In the equation below we have:
Our initial number:
Revenue per order = $100
Expenses = $40
Margin = $60

Our desired advertising results:
Advertising expenses = $50
Profit = $10
Conversion rate = 5%
ROI = 11.1%
How many sales a month do you want to get? Say you want to start with 10 sales per month. If your cost per sale is around $50, your monthly budget should be $50 *10 = $500/mo.
Next? How to convert users once they’re on your site!